Wednesday, December 18, 2019

Doorbell

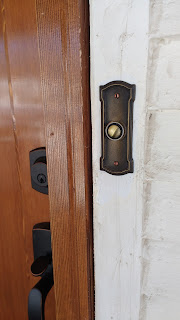
I, finally, replaced the doorbell!  The one that was installed in the house was wireless with no option to wire the chime or button.  Unfortunately, we didn't know this when we, initially, moved in and had purchased a very nice, new cast bronze button this past Summer.  Because I wanted a classic style button, it would require purchasing a doorbell chime that supported a traditional hard-wired setup. And, I really, really disliked having a plastic button. Something more appropriate and solid should appear on an old home. I have, yet, found an all metal doorbell button for a wireless system.

Earlier this Fall, while cleaning up debris in the attic, I stumbled across the instruction sheet for what I assume was the original doorbell.  The wiring in the attic, which was old and sheathed in cloth, was either 18 or 20 gauge. Although it appeared to be ok and is attached to a low voltage transformer, I didn't want to take any chances. Also, at the time, I had no idea where the transformer was located and assumed it was hidden behind a wall, which is a big no-no.  Over the past few weeks, I kept looking for the transformer and realized it was right in front of me the entire time!  The transformer used for the furnace had a set of newer wires attached that I traced to the floor joists in the basement.  To ensure these wires were, indeed, for the doorbell, I purchased a voltmeter, cut the wires in the attic and tested them. The wires were live, but in order to ensure those newer wires were attached to the ones in the attic, I turned of the power to the furnace transformer--Bingo!  The problem, however, was that I was not going to attach anything to those old wires in the attic, especially, since I had no idea where the connection between the newer and older wires was located.  I would, instead, rewire the entire system and have to pull new wire in the walls. Also, the furnace transformer is 24 volt and almost all doorbell systems use only 16 volts.

During the kitchen and bathroom renovation, I had asked to have the doorbell system replaced, but the electrician, who had over 40 years of experience, was hesitant to do it.  I couldn't figure out why  he balked at doing it.  After doing all the rewiring myself, including installing a dedicated transformer, I understand why he didn't want to do it--the labor cost would have been very high. I'll spare you the details, but what looked on paper to be a simple process, was a time consuming process.  But, it's done and the only thing that's visible is the actual doorbell button on the front porch along with the new chime above the kitchen entry (this was the traditional location for the chime box in old homes...).  All the behind the scenes work will, soon, be covered by new attic insulation, but every time someone pushes the button, the Westminster chime will remind me of all the trouble shooting, problem solving, and physical work it took to update such a simple item.

Tuesday, December 3, 2019

Busy in the Attic

This evening, I finally have something to show for all the hours I've spent in the attic.  Since the attic is a place I hope to not frequent after the insulation is added, I still thought it was necessary to have a "landing pad" when the attic door is removed for access. Also, it provides a place to not worry about balancing on ceiling rafters and, potentially, stepping through the plaster ceiling.

I know it's over engineered, but it's definitely built to last.  A lot of platforms in attics have no insulation beneath them.  I ensured there was, at least, some insulation.  Since this is located over part of the hallway and a closet, there wasn't much concern about under insulating the area.  I was able to get the insulation to R30 using Roxul (Rock Wool) batts.  It's specifically designed for 2x4 framing.  It's not cheap but it's really dense, high quality insulation.
First layer of Roxul (R15) w/ the added framing
Second and final layer of Roxul (R15) w/ a total of R30
Originally, I was planning on using plywood for the decking, but, at the last moment, I opted for 6-inch wide planks. It eliminates any flex in the flooring, which was a concern due to having a section span of 20 inches OC (on center).
Finished and deemed by my Wife as solid enough to dance on!
The next step will be to add a plywood perimeter to keep the blown-in insulation from spilling onto the decking and attic hatch. This attic project is definitely taking up more time than I anticipated...

Monday, December 2, 2019

"Unseen" Progress

Ever since the main renovations were completed, improvements to the house have been slow, at first glance.  But, the work has been, mostly, focused on the attic.  After getting two quotes, as well as, another on-site visit resulting in no follow-up, we've decided to do the work ourselves.

The first step involved removing all the old wood Red Cedar shingles: yes, I found fragments of old, paper wrapping in the attic.  It was a tedious process, as it required delicately maneuvering across ceiling joists in an attempt to avoid disturbing the plaster ceilings. Surprisingly, I didn't find any random items, other than a 1970's style long-sleeved shirt buried in the existing mineral wool insulation.  Regardless, it was a dirty job, but one that gave me the opportunity to become intimately familiar with the attic.

While spending more time than I preferred in the attic, I discovered poor installation of the new bathroom vent ducting resulting in the connection becoming detached from the fan housing, a missing wiring panel plate for the bathroom fan housing (the workers didn't install it during the renovation), a barely attached range hood duct (hanging by one screw with about an inch of daylight to the roof cap, and connected wires for the bath/shower light that were not inside an electrical box, but just wire nutted and wrapped with electrical tape. *sigh*  I received a reduction from the contractor for all of these items, although he denied anything was wrong or that his worker had anything to do with the electric wires outside of an enclosed junction box. While I have detailed photographic proof of all these discrepancies, I have no desire to post them. More importantly, if someone who was quick to espouse their "40 years of experience", I was not going to let those items be corrected by someone who can't even admit fault on errors or poor workmanship.

Because of the previous items, I was sidetracked with correcting (replacing) every issue. Afterwards, I began the process of air sealing each top-plate, plumbing vent stack and electrical line penetrations, and around each ceiling box.  Ever since we purchased our home, I discovered Building Science Corporation, namely Dr. Joseph Lstiburek.  I've read numerous papers he has written and, while I won't go into all the detail of what he has written, namely "stack effect", here is a good overview of the work I have been doing in the attic and should be finished by next weekend.

The final step will be to install the insulation.  My wife and I will complete the work ourselves, saving close to 50% of the cost.  The final insulation rating will be R60, which is overkill, but inexpensive versus R49 (recommended for our area).  While I wanted to install blown-in cellulose or Roxul, I'm not certain the plaster ceilings will support the weight over the long term. Yes, I've done the calculations and the weight differences are substantial. Instead, blown-in fiberglass will be used.  It should make a huge difference in the indoor comfort, especially on those really cold days and nights. There should, also, be some benefit in the Summer against radiant heat from the attic.

When I'm done, there are some who would consider the painful detail and work I have done is overkill. But, this is a house we'll live in for a very long time--no plans to "move up" or "downsize". I believe 830 sq ft is already downsized... :)

No pics this time, but when we're done, I'll post some before and afters.

Wednesday, November 6, 2019

My Turn!

Now that the initial renovations of the bathroom, kitchen, and addition of a covered back porch are complete, it's time to begin jumping in feet first on making improvements and necessary repairs to our house.

The original logic was to get the "big" stuff done before Winter. I could have done most of the work, myself, and contracted out the specialty work, but we wanted be finished no later than early October. Plus, uncovering unknown issues in 91 year old house is something I had no experience and had some anxiety in discovering one of those nightmare scenarios scene on the renovation shows.  Thankfully, no major issues were discovered.

The first order of business was replacing the ceiling fans in the living room and bedroom, plus, adding one to my office. I tend to overthink everything and figuring out the style of the ceiling fans was no exception.  In the end, I decided to stick with a brand that was available when our house was built: Hunter.  The ceiling fans that were installed when we purchased the house didn't have light kits and definitely looked dated. In order to ensure the lights didn't hang too low, I chose the "hugger" variety in a traditional style. These don't have the typical downrod and, instead, flush mount to the ceiling with a more finished look. And, to stay with the lighting finishes in the kitchen, they are oil-rubbed bronze. Also, to keep it simple, I, purposefully, wanted fans/lights with pull chains and no remotes. This would ensure no modern looking light switch/controller was needed. We splurged on the living room fan and purchased the flagship Hunter line: Casablanca.

Casablanca "Durant" (living room)
Hunter "Newsome" (bedroom)
The only original fixture (c.1928) in the house was the one in the office.  It was a stamped metal fixture that had been painted and shades. I have thought about this fixture shortly after we bought the house. At first, I was going to save it; I thought it was porcelain, but after some investigating, I determined it was stamped steel with the sleeve around the sockets being porcelain. During some investigation, I discovered the wiring and sockets were original and, after, replacing the bulbs in it, one of the sockets stopped working.  After some discussion with my Wife, we decided to replace it with a ceiling fan. Since I'm superstitious, while permanently removing the fixture, I was talking to the house in hopes of not disturbing any lingering spirits. Yes, I know...   And, for now, the fixture is still in the house and safely stored in the basement utility room. Just in case. ;)


Thursday, October 10, 2019

New Bathroom!

After the shower curtain arrived a day early, we can, now, confidently declare the bathroom is finished!  Out of the three main renovation items, this one was out of commission the longest: almost three months.  It wasn't due to complicated changes, but just a combination of several things.  Due to a code issue with the faucet I purchased, I had to go through the arduous task of finding a compliant one and wait for it to be delivered. Then, rescheduling the very busy master plumber to come back to install it.  The first faucet took over five weeks to be delivered, due to being on backorder.

Tomorrow, we'll take our first showers in the bathroom.  We're grateful we had the rare luxury of having a second bathroom (3/4 bath) in the basement to use for the past three months.

Before
After

Before
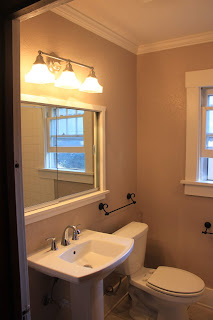
All of the added fixtures are Kohler. As mentioned in a previous post, I discovered the long-held belief the original tub was, also, made by Kohler. It's difficult to discern from the picture, but the wall color is now a medium grey.  Excluding the tub, everything has been replaced, top-to-bottom. The sconce lights are replicas from the 1920's. I did find an identical vintage pair online, but decided to purchase new. They were handmade in Oregon.  The faucet, which was a splurge, is solid brass, nickel plated with cross handles and is more akin to the Art Deco style, which began in the 1920s and became all the rage in the 1930's.

It's difficult to tell, but the walls were retextured to mimic the original plaster walls found throughout the rest of the house.  When we purchased the house, the bathroom had been renovated, the plaster walls replaced with drywall, and a knockdown texture was used on the ceiling and walls.

Heated floors were added and, while we weren't so sure about it, we are very happy to have it on those unexpected nature calls on cold nights. Walking on a warm floor is a better experience than we ever expected.

The medicine cabinet was another splurge and is a replica from the period, including the nickel cabinet latch, and cannon ball-tipped hinges.  One of the more tedious processes was restoring all of the door hardware to original condition. Over the years, the moisture in the bathroom caused some surface corrosion. Thankfully, there was no pitting and I was able to restore everything to it's original stainless steel condition.
After


I installed the shower curtain rod earlier this week and had been dreading it, since I knew it would require drilling through the tilework to mount the brackets. My biggest fear was cracking a tile, but, thankfully, I was able to complete the work without any issues. Also, I used one of the best tile (technically, ceramic tile doesn't need sealing) and grout sealers available, yesterday. That will ensure the life of the tile work indefinitely, as long as it's applied every few years.

Before
After
Since the bathroom is small by today's standards, my goal was to maximize the space and give the perception the room was bigger than it, actually, appeared.  That was the main reason for removing the knee wall someone had built in the recent past. That's, also, why the headwall where the faucet and shower head were located was removed. We may have lost storage space, but it opened up the room.  I'm still in disbelief how good of shape the porcelain is on the circa 1928 rolled lip corner tub. We could have had the tub resurfaced, but the longevity of the coatings is not guaranteed.  We're grateful to have a piece of bathtub history in our house: it's the "tweener" between the clawfoot tub and today's apron front tub.
Before
After
Overall, the bathroom isn't trendy and is similar to what the original bathroom would have looked like, sans the hex tile floor: originally was solid red oak.  But that's ok. The tile and design was used in many bathrooms during that decade. The vision I had came out almost exactly as planned and I'm looking forward to that first hot shower, early tomorrow morning...

Thursday, October 3, 2019

New Kitchen!

After almost ten months of pouring over the details of our kitchen design, it has, finally, come to fruition.  I took a, fairly, pragmatic approach in determining the style used in the kitchen. While many individuals are apt to hire a designer, I was excited to engage in researching and making decisions with my Wife.

From cabinetry and layout, restoring the original c.1928 Red Oak flooring, appliances and their location, backsplash, lighting and placement, blinds, back door, countertops, sink, faucet, and paint color, every decision involved many hours, sometimes weeks or months, in finalizing.  The challenge was clearly communicating the vision to our Contractor and his Subs.  While some items were not exactly how I wanted them, the entirety of the completed work is very satisfying for my Wife and I.

The main premise was to keep it simple and timeless--we only wanted to do this once!  I chose a full gas range (cooktop & oven) made in Italy for it's lack of electronic gadgetry, as well, as being counter depth to eliminate any protrusions past the front edge of the countertop. The range hood is far above the recommended CFM for the maximum range BTU output, but, considering we don't have air conditioning, it should minimize heat build up during the Summer months.  Which leads me to the uncommon choice of adding a ceiling fan for additional comfort during the warmer months of the year.  It's a throwback to the early 1900's Hunter ceiling fans. In fact, it's a replica which requires adding oil every few years to a reservoir. It's made of cast iron and is definitely mounted into solid wood ceiling joists above it.

While there are many trends in sinks for this style of kitchen, namely, the farmhouse fireclay variety, I was hesitant to follow the trend. The jury is still out on the longevity and durability of fireclay used in a kitchen setting, especially when paired with a garbage disposer.  Instead, I opted for a similar style, but choosing the same material that would have been used in the 1920s: cast iron porcelain.  It's a beast and weighs 120 pounds, but has a sense of permanence. The faucet, while not from the period for a Craftsman Bungalow, was a last minute change from what I had originally chosen. Again, no bells and whistles.  Just a solid brass, nickel plated bridge faucet made in Italy.  No sprayer, no soap dispenser: when the countertops were installed, the company kept asking if we needed holes drilled for those. They were in disbelief that I kept saying "no".  Again, keeping it simple. The backsplash is the tried and true white subway tile and timeless for a 1920s bungalow. 

The light above the sink and back door were handmade in Oregon and in the style of the house.  I, seriously, considered purchasing rewired, vintage pieces but chose new, instead. The glass door cabinet was an idea to, in a way, mimic a Hoosier cabinet.  We chose an 18-inch dishwasher over a standard 24-inch width, in order to preserve precious cabinet space.  The countertops are quartz, but mimic what was my first choice, soapstone. My Wife was very hesitant about using soapstone after we visited the local countertop business. She chose a variety just
introduced this year that looks like natural stone and won't date the kitchen in 10 years. The nickel plated drawer pulls are in the spirit of the era and, again, my Wife chose these, instead of the traditional cup pulls.  Her choice was definitely superior, in my opinion!  Although nickel hardware is, arguably, the most popular finish in new homes, today, it was not chosen to follow that modern trend. Chrome finishes did not appear in households until the early 1930's. and nickel was the standard finish.

One of the other updates that was made was the addition of a baluster going to the basement.  Before, this was a solid half wall and my intention was to bring as much perception of space, as possible, into the kitchen.  Mainly, because this is our only dining area.

And, the removal of the sliding glass door and addition of a solid Douglas Fir door with a sidelight finished out the vision. Staining the door, instead of painting it, was a last minute change, due to the beauty of the straight-grained Fir . Again, a timeless wood choice that would have been used in the 1920s.  Lastly, the wall color was my Wife's choice: Sherwin Williams "Willow Tree". And, she has received many complements on her choice.

Overall, I like to call the kitchen "1920's Modern".  It was an attempt to blend 1920s styling with modern touches with the final outcome meant to avoid a trendy design that will be dated in a decade.  The process, especially, the renovation was very stressful, at times. But, in the end, that stress has, for the most part, melted away and soon to be forgotten as we enjoy our bliss each day in our new kitchen...

One last thing, below is a montage of before & after views my Wife put together. It really shows the huge difference!


Thursday, September 26, 2019

New Door!

This past week, the exterior doors, front and back, were installed, including all new casing. When we, originally, ordered the doors, I wasn't certain what paint or stain color we'd use.  All it took was the initial glance of the doors as they were unloaded from the truck to realize the obvious choice: stained.  The doors and casings are 100% Douglas Fir.  It would have been sacrilege to cover that beautiful, straight, tight, grain with paint.

Lucky for us, our Contractor's Sub for painting is a craftsman in his own right and seems to know everything about paint.  He's been at his craft for 30 years. Although the Sub has several employees, he stained the doors, himself.  He still has one more coat of varnish to apply, after a light sanding, but they're a timeless addition to our home.

We selected, what would have been the same style, original to the house.  Even though we have no proof there was ever a 3-light door on our house, there are plenty of original examples throughout the neighborhood, specific to Arts & Crafts Bungalows. One thing I'm certain of, however, the door would have been made of solid Fir.

The selection of the handleset was a compromise between 1920's and modern day style.  The sectional style (i.e. deadbolt and handle being separate) was a standard configuration sans a mortise vs. tubular (today's standard) lock and latch assembly.  The Colonial style was, also, the standard for entry sectional handlesets. Coincidentally, the new exterior locks are manufactured locally!

I have been dead set on installing a full view (all glass w/ the ability to change out the insert with a full screen) storm door, but, after seeing the door installed and stained, I'm having second thoughts...

Tuesday, September 10, 2019

It's a Kohler!

In a previous post, I mentioned how I thought the tub in our bathroom was made by Kohler, specifically, a "Cardinal" corner rolled-lip tub.  The problem was, I had no verifiable proof, since I could not find any markings on the side of the tub.  But, it did match the exact dimensions I had seen in a 1925 hardware catalog. Well, that assumption is now a fact and the markings were not on the side of the tub.  Very early this morning (6am), I was cleaning some of the old mortar and glue off the lip of the tub where a previous homeowner decided to try and convert the space into a traditional apron-style tub alcove.  I was cleaning the tub because the plumber is supposed to be here today to install the tub faucet, supply lines, and waste line; I wanted the mounting surfaces to be squeaky clean.

Kohler U.S.A.

As I was making my way around the top of the tub edge, there it was, "plain" as day. Well, ok, fairly faded, but still legible in blue--"Kohler U.S.A.".  To say I was a little excited is an understatement!  Now, I can justify to my Wife the cost of putting a high-end Kohler toilet and sink in the bathroom. Things have to match, right?  Below is a page copy from an original 1925 hardware catalog showing the tub.


Top tub is the correct model
The bathroom is moving along and, now, is nearing completion--fingers crossed. Here is a pic of the tub ready for the faucet installation.

Kohler stamp was in the top right portion of this pic on the top of the tub

Tuesday, August 27, 2019

Kitchen Floor

Several months ago, when we began the process of what to do with the kitchen floor, the idea surfaced to remove the 12x12 tile located at the rear entry.  Now, mind you, there are plenty of examples of homeowners in our neighborhood attempting to "modernize" their 100+ year old houses by having their entire kitchens updated with the latest trend in porcelain or ceramic tile. The problem with that is the modern look, eventually, becomes a dated look--think avocado green appliances.  We wanted timeless and the solution was to revert to what we knew was the original flooring--red oak.

We don't have many pictures of that tile floor, since it was an eyesore from our perspective. I'm certain it served it's purpose for previous owners as it provided a durable, waterproof surface when entering from the, then, uncovered rear entry steps.  But, now, we have an, almost complete, covered rear stoop to protect the floor from any rain or snow.
Tile floor at rear entry
After wood floor replacement


No words needed...
The man who "feathered in" the wood floor did a masterful job and we couldn't be more pleased. The great thing about the materials used in old homes is the same materials are, typically, available today. The exact floor (2 1/4" width x 3/4" thick) solid red oak floor can still be easily purchased today, almost 100 years later! And, the interesting thing is it costs half, per square foot, than the cheapest hardwood flooring found in the big box stores. Of course, there is the cost of installation, which includes sanding the old and new floor, and, then, applying a durable finish. But, the results are amazing!

Planks installed (pre sanding/finishing)
Finished floor

After installation (before finishing)
After

Friday, August 16, 2019

Some Progress

The main bathroom finally has new tile!  We went with something timeless and appropriate for the house, instead of succumbing to the latest renovation trends in tile.  The wall tile is the classic subway tile, but with a matte finish.  That was my Wife's choice and it was definitely the correct choice as it looks fantastic!.  For the floor, we used hexagonal tile with a few "daisy" patterns added, which is period appropriate. While they are spec'd as 1-inch tile, they're not true to that size. It's next to impossible to find a true 1-inch hex tile, but they can still be found, specifically, from this company. I would have used this company if the timeline would have allowed.  We were still holding out hope there was an original hex tile floor underneath the square tile floor, due to the obvious buildup at the door threshold.

What was interesting about the original bathroom is that the red oak flooring throughout the house was, also, in the bathroom.  That was, actually, a big surprise, but it was in very rough shape and not only had been exposed to water but had an underlayment added in order to have 12-inch tile laid on top.  It seemed more practical to install hex tile and stay within the spirit of the 1920s.

Original Red Oak flooring
"Original" configuration
Here are a few "in process" demo pics, along with the new tile.  It's difficult to tell from the light, but the walls are now painted slate, which is a softer version of a medium gray.

The tub is an original fixture of the house and in very good shape: I believe it was a Kohler "Cardinal" corner rolled-lip tub. When we purchased the house, it had a knee wall surrounding the side and a full wall to accommodate modern fixtures.  We will be installing what would have been vintage-styled nickel plated tub faucet and shower riser--chrome plated faucets didn't enter residential areas until the early 1930's and I'm not a fan of the bluish cast of chrome versus the warm tones of nickel.

Before

After
Here are a few more before and after pics.  The next steps will be having the sides of the tub resurfaced and having the tub plumbing installed.
Before
After

Before
After

Friday, July 26, 2019

Small Piece of History...

This morning, I was carefully removing the hinges from the bathroom doorway so I can refurbish them.  While removing the bottom hinge (these are original hinges, by the way), I noticed it wasn't positioned in the mortise, but, rather, slightly above it.  After removing the hinge, there seemed to be a piece of paper being used to shim the hinge. But upon carefully removing the paper, I noticed it was three layers of paper, plus a piece of very thin cardboard.

Immediately, I noticed handwriting and plain as could be, the name "Zirkel".  It was a post card letter from 1958. It's the first historical proof within these walls I have found of who has lived in our home.


Wednesday, July 24, 2019

Renovation begins...

The renovation, officially, began last week.  I'll share pictures in a later post of the progress.  It's been hectic and will be completed in stages. The bathroom has been demo'd and was done in a meticulous manner, which I appreciate.  I joked that it was as if they were dismantling a nuclear bomb.  A few days later, the back steps were jack hammered and hauled off.  It was another job done with care to ensure no damage was done to the foundation wall. There was concern the steps were, possibly, attached to the house with reinforced metal, but that was not the case.  In fact, there was no reinforcement in the steps, yet they stood with nary a crack for almost 100 years!  Now that the steps have been removed, it's obvious they were an original part of the house.

It has been very difficult, for me, to watch the work that has begun.  I've never had this type of work done by someone else.  The knowledge I do have is an emotional weakness as I am not in control of the process.  But, we know we are in excellent hands and I need to trust the process and the very high level of experience (i.e. many decades!) entrusted to our home.

Today, I decided to see if I could remove the corrosion on the original wrought steel door hinges that are attached to the bathroom door stored against the wall in my office.  I wasn't certain if I could remove the discoloration and what appears to be rust (it isn't).  It didn't take long to make a drastic change, which I'm thankful. Just a few more steps and I'll be satisfied, but here is the before and after. These hinges were manufactured by Hager. The manufacturer name is embossed on the mortise portion of this hinge.

Before removing from the door
After...
 Huge improvement!!!

Thursday, June 20, 2019

First Blooms

The roses in the back yard have, finally, begun blooming. One of the varieties is known as "Pink Knock Out" and is a shrub rose variety. The great thing about these are they are disease resistant and prolific bloomers. The only reason I know the exact variety is I found the metal tag at the base of one of the bushes while weeding.
Pink Knock Out 'Radcon'
 The second variety is unknown but more in the category of a Tea Rose.


Besides the roses, the Columbines are blooming quite nicely, although, they aren't in the traditional color schemes. I'll have to take a few pictures of those, as well...