After the shower curtain arrived a day early, we can, now, confidently declare the bathroom is finished! Out of the three main renovation items, this one was out of commission the longest: almost three months. It wasn't due to complicated changes, but just a combination of several things. Due to a code issue with the faucet I purchased, I had to go through the arduous task of finding a compliant one and wait for it to be delivered. Then, rescheduling the very busy master plumber to come back to install it. The first faucet took over five weeks to be delivered, due to being on backorder.
Tomorrow, we'll take our first showers in the bathroom. We're grateful we had the rare luxury of having a second bathroom (3/4 bath) in the basement to use for the past three months.
 |
| Before |
 |
| After |
 |
| Before |
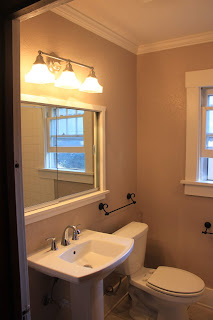
All of the added fixtures are Kohler. As mentioned in a
previous post, I discovered the long-held belief the original tub was, also, made by Kohler. It's difficult to discern from the picture, but the wall color is now a medium grey. Excluding the tub, everything has been replaced, top-to-bottom. The sconce lights are replicas from the 1920's. I did find an identical vintage pair online, but decided to purchase new. They were handmade in Oregon. The faucet, which was a splurge, is solid brass, nickel plated with cross handles and is more akin to the Art Deco style, which began in the 1920s and became all the rage in the 1930's.
It's difficult to tell, but the walls were retextured to mimic the original plaster walls found throughout the rest of the house. When we purchased the house, the bathroom had been renovated, the plaster walls replaced with drywall, and a knockdown texture was used on the ceiling and walls.
Heated floors were added and, while we weren't so sure about it, we are very happy to have it on those unexpected nature calls on cold nights. Walking on a warm floor is a better experience than we ever expected.
The medicine cabinet was another splurge and is a replica from the period, including the nickel cabinet latch, and cannon ball-tipped hinges. One of the more tedious processes was restoring all of the door hardware to original condition. Over the years, the moisture in the bathroom caused some surface corrosion. Thankfully, there was no pitting and I was able to restore everything to it's original stainless steel condition.
 |
| After |
I installed the shower curtain rod earlier this week and had been dreading it, since I knew it would require drilling through the tilework to mount the brackets. My biggest fear was cracking a tile, but, thankfully, I was able to complete the work without any issues. Also, I used one of the best tile (technically, ceramic tile doesn't need sealing) and grout sealers available, yesterday. That will ensure the life of the tile work indefinitely, as long as it's applied every few years.
 |
| Before |
 |
| After |
Since the bathroom is small by today's standards, my goal was to
maximize the space and give the perception the room was bigger than it,
actually, appeared. That was the main reason for removing the knee wall someone had built in the recent past. That's, also, why the headwall where the faucet and shower head were located was removed. We may have lost storage space, but it opened up the room. I'm still in disbelief how good of shape the porcelain is on the circa 1928 rolled lip corner tub. We could have had the tub resurfaced, but the longevity of the coatings is not guaranteed. We're grateful to have a piece of bathtub history in our house: it's the "tweener" between the clawfoot tub and today's apron front tub.
 |
| Before | |
 |
| After |
Overall, the bathroom isn't trendy and is similar to what the original bathroom would have looked like, sans the hex tile floor: originally was solid red oak. But that's ok. The tile and design was used in many bathrooms during that decade. The vision I had came out almost exactly as planned and I'm looking forward to that first hot shower, early tomorrow morning...


No comments:
Post a Comment