Wednesday, December 18, 2019

Doorbell

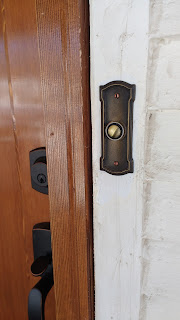
I, finally, replaced the doorbell!  The one that was installed in the house was wireless with no option to wire the chime or button.  Unfortunately, we didn't know this when we, initially, moved in and had purchased a very nice, new cast bronze button this past Summer.  Because I wanted a classic style button, it would require purchasing a doorbell chime that supported a traditional hard-wired setup. And, I really, really disliked having a plastic button. Something more appropriate and solid should appear on an old home. I have, yet, found an all metal doorbell button for a wireless system.

Earlier this Fall, while cleaning up debris in the attic, I stumbled across the instruction sheet for what I assume was the original doorbell.  The wiring in the attic, which was old and sheathed in cloth, was either 18 or 20 gauge. Although it appeared to be ok and is attached to a low voltage transformer, I didn't want to take any chances. Also, at the time, I had no idea where the transformer was located and assumed it was hidden behind a wall, which is a big no-no.  Over the past few weeks, I kept looking for the transformer and realized it was right in front of me the entire time!  The transformer used for the furnace had a set of newer wires attached that I traced to the floor joists in the basement.  To ensure these wires were, indeed, for the doorbell, I purchased a voltmeter, cut the wires in the attic and tested them. The wires were live, but in order to ensure those newer wires were attached to the ones in the attic, I turned of the power to the furnace transformer--Bingo!  The problem, however, was that I was not going to attach anything to those old wires in the attic, especially, since I had no idea where the connection between the newer and older wires was located.  I would, instead, rewire the entire system and have to pull new wire in the walls. Also, the furnace transformer is 24 volt and almost all doorbell systems use only 16 volts.

During the kitchen and bathroom renovation, I had asked to have the doorbell system replaced, but the electrician, who had over 40 years of experience, was hesitant to do it.  I couldn't figure out why  he balked at doing it.  After doing all the rewiring myself, including installing a dedicated transformer, I understand why he didn't want to do it--the labor cost would have been very high. I'll spare you the details, but what looked on paper to be a simple process, was a time consuming process.  But, it's done and the only thing that's visible is the actual doorbell button on the front porch along with the new chime above the kitchen entry (this was the traditional location for the chime box in old homes...).  All the behind the scenes work will, soon, be covered by new attic insulation, but every time someone pushes the button, the Westminster chime will remind me of all the trouble shooting, problem solving, and physical work it took to update such a simple item.
Tuesday, December 3, 2019

Busy in the Attic

This evening, I finally have something to show for all the hours I've spent in the attic.  Since the attic is a place I hope to not frequent after the insulation is added, I still thought it was necessary to have a "landing pad" when the attic door is removed for access. Also, it provides a place to not worry about balancing on ceiling rafters and, potentially, stepping through the plaster ceiling.

I know it's over engineered, but it's definitely built to last.  A lot of platforms in attics have no insulation beneath them.  I ensured there was, at least, some insulation.  Since this is located over part of the hallway and a closet, there wasn't much concern about under insulating the area.  I was able to get the insulation to R30 using Roxul (Rock Wool) batts.  It's specifically designed for 2x4 framing.  It's not cheap but it's really dense, high quality insulation.
First layer of Roxul (R15) w/ the added framing
Second and final layer of Roxul (R15) w/ a total of R30
Originally, I was planning on using plywood for the decking, but, at the last moment, I opted for 6-inch wide planks. It eliminates any flex in the flooring, which was a concern due to having a section span of 20 inches OC (on center).
Finished and deemed by my Wife as solid enough to dance on!
The next step will be to add a plywood perimeter to keep the blown-in insulation from spilling onto the decking and attic hatch. This attic project is definitely taking up more time than I anticipated...

Monday, December 2, 2019

"Unseen" Progress

Ever since the main renovations were completed, improvements to the house have been slow, at first glance.  But, the work has been, mostly, focused on the attic.  After getting two quotes, as well as, another on-site visit resulting in no follow-up, we've decided to do the work ourselves.

The first step involved removing all the old wood Red Cedar shingles: yes, I found fragments of old, paper wrapping in the attic.  It was a tedious process, as it required delicately maneuvering across ceiling joists in an attempt to avoid disturbing the plaster ceilings. Surprisingly, I didn't find any random items, other than a 1970's style long-sleeved shirt buried in the existing mineral wool insulation.  Regardless, it was a dirty job, but one that gave me the opportunity to become intimately familiar with the attic.

While spending more time than I preferred in the attic, I discovered poor installation of the new bathroom vent ducting resulting in the connection becoming detached from the fan housing, a missing wiring panel plate for the bathroom fan housing (the workers didn't install it during the renovation), a barely attached range hood duct (hanging by one screw with about an inch of daylight to the roof cap, and connected wires for the bath/shower light that were not inside an electrical box, but just wire nutted and wrapped with electrical tape. *sigh*  I received a reduction from the contractor for all of these items, although he denied anything was wrong or that his worker had anything to do with the electric wires outside of an enclosed junction box. While I have detailed photographic proof of all these discrepancies, I have no desire to post them. More importantly, if someone who was quick to espouse their "40 years of experience", I was not going to let those items be corrected by someone who can't even admit fault on errors or poor workmanship.

Because of the previous items, I was sidetracked with correcting (replacing) every issue. Afterwards, I began the process of air sealing each top-plate, plumbing vent stack and electrical line penetrations, and around each ceiling box.  Ever since we purchased our home, I discovered Building Science Corporation, namely Dr. Joseph Lstiburek.  I've read numerous papers he has written and, while I won't go into all the detail of what he has written, namely "stack effect", here is a good overview of the work I have been doing in the attic and should be finished by next weekend.

The final step will be to install the insulation.  My wife and I will complete the work ourselves, saving close to 50% of the cost.  The final insulation rating will be R60, which is overkill, but inexpensive versus R49 (recommended for our area).  While I wanted to install blown-in cellulose or Roxul, I'm not certain the plaster ceilings will support the weight over the long term. Yes, I've done the calculations and the weight differences are substantial. Instead, blown-in fiberglass will be used.  It should make a huge difference in the indoor comfort, especially on those really cold days and nights. There should, also, be some benefit in the Summer against radiant heat from the attic.

When I'm done, there are some who would consider the painful detail and work I have done is overkill. But, this is a house we'll live in for a very long time--no plans to "move up" or "downsize". I believe 830 sq ft is already downsized... :)

No pics this time, but when we're done, I'll post some before and afters.