Thursday, January 7, 2021

Do people still roast chestnuts?

Maybe, not.  But, we do have an officially functioning fireplace, as of, this week! But, before I delve into that, some background is needed.

Last May, I had the original chimney that was used, specifically, for the original coal furnace and kitchen stove, repointed.  This appears to be the first repair ever made on the chimney as the mortar joint color appeared consistent.  Throughout the neighborhood, there are several examples of repairs and it is painfully obvious, based on the mortar color differences.  Repointing a chimney entails removing most of the existing mortar between the bricks and replacing it with new mortar. Completed correctly, the repair will last a very long time.

Before
 
 
After

Afterwards, the mason provided an assessment of the fireplace.  He said the existing flue was not salvageable and needed to be removed and replaced with a metal flue liner. This would entail cutting a hole in the existing (original) cast iron dome damper (think of it as the roof inside the main firebox) to retrofit the new flue pipe. In addition, it was recommended to have an insert put into the existing firebox.  In all, the quote was almost $20k.  I said, "thanks" and told him I'd needed to think about it.  I paid for the repointing work and that was my last contact with him.  Nice guy, but $20k is a lot of opportunity cost.

Since it was Spring, I decided to put the entire idea of having an original, functioning fireplace out of my mind, mainly because it appeared to be a very expensive proposition and, also, I wasn't interested in destroying an original feature of the house.  I had succumbed to having a fireplace with a bunch of lit candles decoratively displayed in the firebox.

In the early Fall, after some thought, I began looking for someone to provide a second opinion and whom would be more sensitive to preserving old home character.  Eventually, I found a local, small company to inspect the fireplace. The challenge was scheduling--he was very busy, mostly because there are so many old homes in our area.  This past Monday was his first opening and I was both excited and anxious about his visit.

He inspected the entire fireplace, top-to-bottom, and said it was in very good condition, including the clay tile flue. That was a relief!  The fireplace was thoroughly cleaned and it was amazing how much creosote was removed from the flue.  A minor repair to a firebrick in the firebox was made and we had an official Level II inspection completed--$145 total cost!

One of the neat things about the fireplace is the cast iron fire basket (technically, it is a coal basket as that what was mostly used in 1920s fireplaces in our area). It is in fantastic condition and original to the fireplace.  I'm confident it is original, since it fits perfectly inside the not so perfectly square firebox.
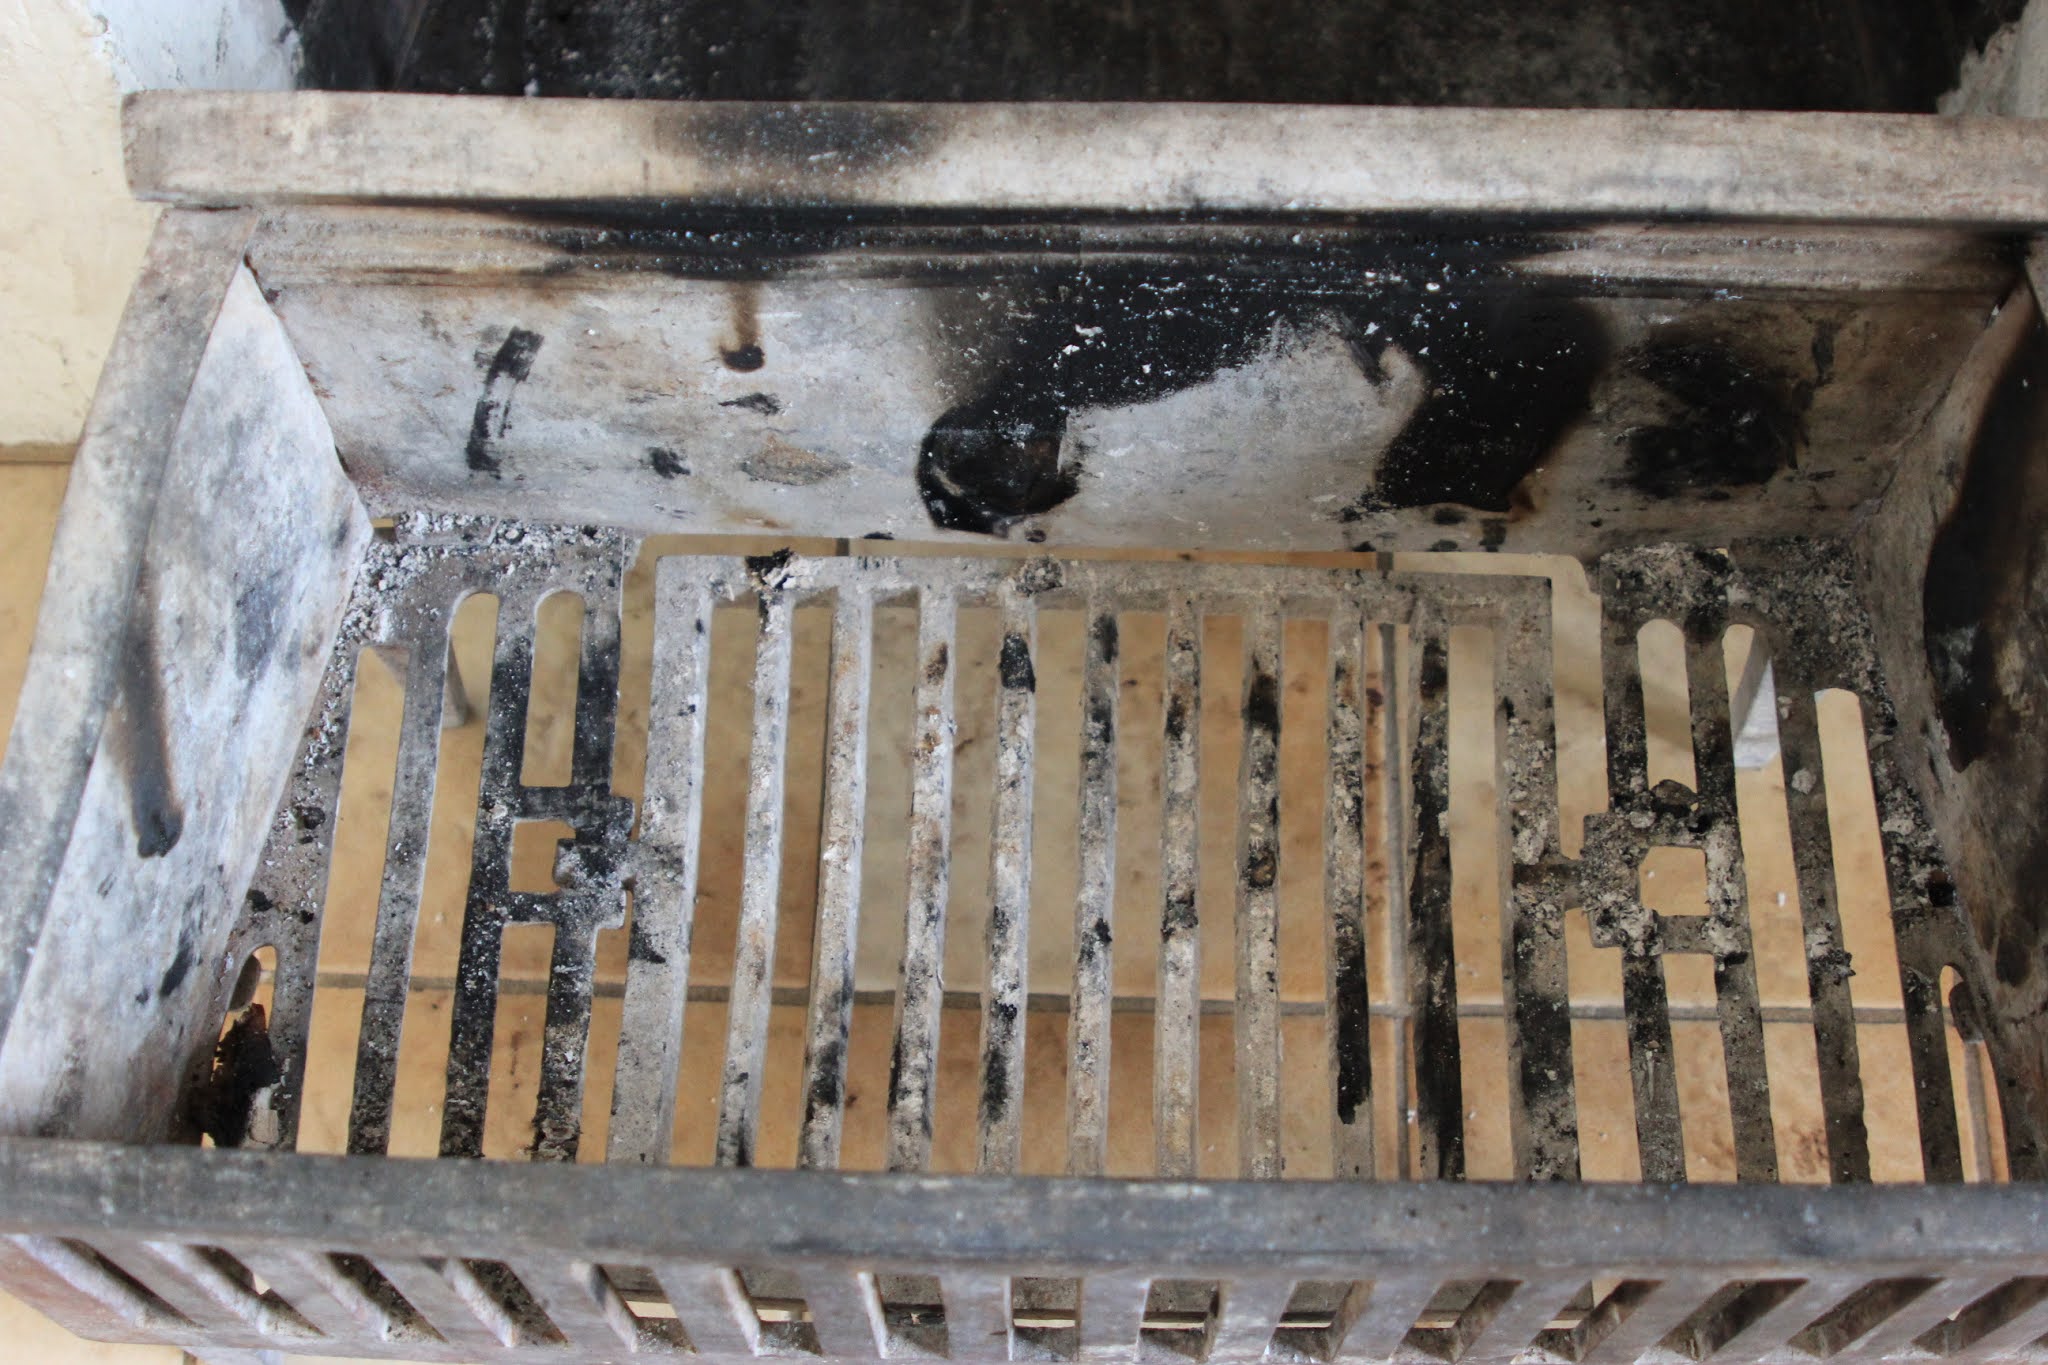

Built-in swivel ash dump

Fits like a glove!

The next phase will be having the entire facade of the fireplace updated to a style common in many Arts and Crafts bungalows.  While the fireplace is originally brick, in the past (guessing the '90's), someone decided it would look better with a thin skimcoat of mortar applied and painted. I assume this was done to mimic a more Mediterranean style. Ugh! Unfortunately, it is impossible to restore the facade back to its original condition without damaging almost all of the brick. But, I abhor how it currently looks. This past year, I found and and have been in communication with an individual in Pasadena, California who specializes in creating Arts and Crafts fireplaces.  They will create the design, custom make every tile, as well as, glaze and fire every tile.  Amazingly, they are in possession of original tile casts from Ernest Batchelder.  That, however, is a project for later this year. The main reason for pursing this is due to the deep history within our own neighborhood of Van Briggle fireplaces.  There are dozens and dozens of homes in our area containing the coveted work of his local early 1900's kiln, which is less than a mile from our home. While it is impossible to have a Van Briggle fireplace in our home, I can have one created using the identical process.

Finally, however, we get to enjoy our fireplace for the first time. So, until the next phase, this will have to suffice...


Monday, May 4, 2020

Spring and New Life

Two Thanksgivings ago, on our first official visit to our new home after closing, one of the first to-do's on my list was removing a twenty-plus foot tree that was growing against the front side of our porch.  I finished the task the day before Thanksgiving.  In the same location as the tree, there was a rather large vine attached to a makeshift wire trellis hanging on the side of the house.  This past Summer, my Wife and I removed the vine and any signs of anything ever being in the location.  The only signs that something did exist were the tree stump and the stump remains of the vine.  Little did I realize what this Spring would bring...


There are several more of the same color just to the right of the pic.  I was both surprised and pleased.  Knowing the vine had been there for a very long time, this may be the first time the tulips have bloomed in decades and is a testament to the hardiness of a flower that has received no care!  I would like to believe Viola Zirkel, herself, planted the bulbs.

We are preparing to landscape directly in front of the house this month.  Once these tulips finish their blooming cycle and regenerate by September, I'll be relocating them to a more appropriate location near the front steps.  They deserve a much better place than where they are today.

Monday, February 17, 2020

Back Porch

As I was perusing through the blog, I realized there wasn't a before-and-after of the back porch.

During the home inspection process, the ideas began swirling in my head about what to do with the back entrance to the house.  The existing function wasn't workable with an immediate step-down from the rear entrance and 2x4's, which were surprisingly solidly mounted, as hand railings.

So, in usual fashion, I began doing a lot of online research for elements that would blend with the original style of the house.  The goal was to have something that looked like it would have been an original feature.  Interestingly, houses built during this period with doors above grade didn't have covered back porches. During our many walks through the neighborhood, we journeyed through many alleys looking for an example to gather inspiration. It didn't matter if the house was valued at three hundred thousand or two million dollars, what I was looking for didn't seem to exist. The only thing I could find  were small shed or hip roofs over the rear entrance and, even, those were rare.  Decks were common, but nothing covered.  Even our house had, at least two iterations of a deck, the most recent, of which, was an enormous structure that I was able to confirm after looking at an archived satellite view and street view on Google maps.

Inspiration
The main goal was to have something which covered the rear entrance, since we would be having the sliding glass door replaced with a solid wood door. Also, the flooring directly inside the house would have the tile removed and replaced with solid wood flooring--there needed to be something at the rear entrance to protect everything from the elements, namely moisture.  Eventually, I found a design online that I thought would blend nicely: not too big and met the functional goal without being an obtrusive addition to the house.  I made some modifications that would allow it to blend in with the house.  After getting the final approval from my Wife, the next step was to get our, eventually, hired contractor to make the vision a reality...


Below is a before and after.  We are very pleased with the end product, although there were definitely some major bumps which occurred during the construction, but I won't go into the details of it here--even the most experienced contractor can screw up the most simple, foundational elements (i.e. pier locations, ensuring the perimeter deck joists were square).  The back porch is just 4ft x 6ft, but exactly the size we wanted.  It was never meant to have a party on, but, instead, to provide a simple function--weather protection.
Before & After

Friday, February 14, 2020

Winter "Pruning"

Time to catch up on a few items, the first being the trees...

Before and the first weather delay
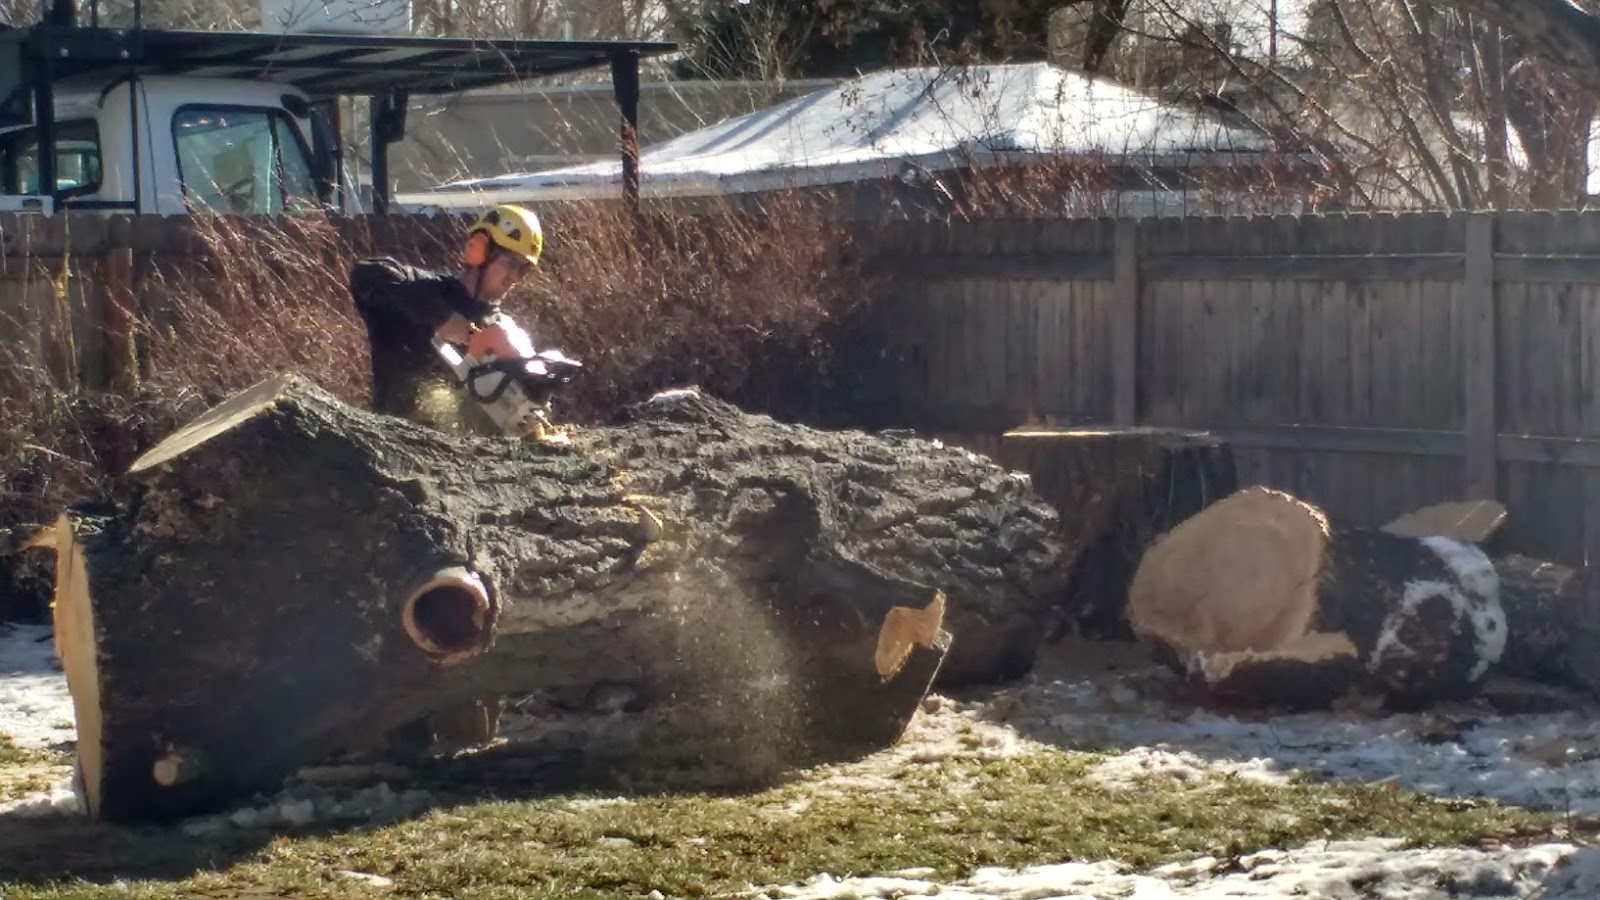
After we purchased our house last year, we made our first, official visit as new homeowners during Thanksgiving week (2019).  One of the things I noticed was the large, mature White Poplar in the back corner of the yard.  It was very large and had 5 main leaders, each, of which, was the size of medium sized tree. One of the concerning things was one of the leaders was dead and hanging almost entirely in our neighbor's back yard.  Also, since Poplars are a soft wood, large limbs would break off during windy days and my main concern being all the power lines and telephone/cable lines within 20 feet of it.  The tree had to go, but we knew we would wait until the following Fall to have it removed.

Crane spanning over our garage to the back of the lot
The first quote we received was astronomical ($10k), which, in my mind, was the company's polite way of saying, "we don't want the job".  But, I persisted and found a company to do the difficult work.  In all, we had three trees removed: the big White Poplar in the back corner of the yard and a smaller, albeit, large one closer to the house. The second tree was between two Blue Spruce trees and it definitely was impacting their health: falling limbs, competing for moisture, and shading the Spruce.  The last tree was in the front yard along the street--a Siberian Elm.

Before and during the process

After a few delays, due to snow, the initial work was done the week of Thanksgiving. We were excited for the work to begin, since the first available scheduling for the initial date was over two months prior. It took two full days to remove the trees with the large tree being the main challenge.  The electrical line to our house was disconnected and dropped to the ground by the City to prevent damage to the overall utility service on our block. This was necessary in case a cut tree limb accidentally fell on the line. The fine to the tree company is $10k per instance!

Down but not out!

Nevertheless, these guys were very professional and took their jobs seriously and everything happened without any issues.  I may have been more stressed about the process than they were, but they did a fantastic job!  Since, I work at home, I had to force myself to stay inside and ignore what was going on in the back yard. A week later, after another weather delay (snow), they came back to grind down the stumps.
4+ feet in diameter!!!

Wednesday, December 18, 2019

Doorbell

I, finally, replaced the doorbell!  The one that was installed in the house was wireless with no option to wire the chime or button.  Unfortunately, we didn't know this when we, initially, moved in and had purchased a very nice, new cast bronze button this past Summer.  Because I wanted a classic style button, it would require purchasing a doorbell chime that supported a traditional hard-wired setup. And, I really, really disliked having a plastic button. Something more appropriate and solid should appear on an old home. I have, yet, found an all metal doorbell button for a wireless system.

Earlier this Fall, while cleaning up debris in the attic, I stumbled across the instruction sheet for what I assume was the original doorbell.  The wiring in the attic, which was old and sheathed in cloth, was either 18 or 20 gauge. Although it appeared to be ok and is attached to a low voltage transformer, I didn't want to take any chances. Also, at the time, I had no idea where the transformer was located and assumed it was hidden behind a wall, which is a big no-no.  Over the past few weeks, I kept looking for the transformer and realized it was right in front of me the entire time!  The transformer used for the furnace had a set of newer wires attached that I traced to the floor joists in the basement.  To ensure these wires were, indeed, for the doorbell, I purchased a voltmeter, cut the wires in the attic and tested them. The wires were live, but in order to ensure those newer wires were attached to the ones in the attic, I turned of the power to the furnace transformer--Bingo!  The problem, however, was that I was not going to attach anything to those old wires in the attic, especially, since I had no idea where the connection between the newer and older wires was located.  I would, instead, rewire the entire system and have to pull new wire in the walls. Also, the furnace transformer is 24 volt and almost all doorbell systems use only 16 volts.

During the kitchen and bathroom renovation, I had asked to have the doorbell system replaced, but the electrician, who had over 40 years of experience, was hesitant to do it.  I couldn't figure out why  he balked at doing it.  After doing all the rewiring myself, including installing a dedicated transformer, I understand why he didn't want to do it--the labor cost would have been very high. I'll spare you the details, but what looked on paper to be a simple process, was a time consuming process.  But, it's done and the only thing that's visible is the actual doorbell button on the front porch along with the new chime above the kitchen entry (this was the traditional location for the chime box in old homes...).  All the behind the scenes work will, soon, be covered by new attic insulation, but every time someone pushes the button, the Westminster chime will remind me of all the trouble shooting, problem solving, and physical work it took to update such a simple item.

Tuesday, December 3, 2019

Busy in the Attic

This evening, I finally have something to show for all the hours I've spent in the attic.  Since the attic is a place I hope to not frequent after the insulation is added, I still thought it was necessary to have a "landing pad" when the attic door is removed for access. Also, it provides a place to not worry about balancing on ceiling rafters and, potentially, stepping through the plaster ceiling.

I know it's over engineered, but it's definitely built to last.  A lot of platforms in attics have no insulation beneath them.  I ensured there was, at least, some insulation.  Since this is located over part of the hallway and a closet, there wasn't much concern about under insulating the area.  I was able to get the insulation to R30 using Roxul (Rock Wool) batts.  It's specifically designed for 2x4 framing.  It's not cheap but it's really dense, high quality insulation.
First layer of Roxul (R15) w/ the added framing
Second and final layer of Roxul (R15) w/ a total of R30
Originally, I was planning on using plywood for the decking, but, at the last moment, I opted for 6-inch wide planks. It eliminates any flex in the flooring, which was a concern due to having a section span of 20 inches OC (on center).
Finished and deemed by my Wife as solid enough to dance on!
The next step will be to add a plywood perimeter to keep the blown-in insulation from spilling onto the decking and attic hatch. This attic project is definitely taking up more time than I anticipated...

Monday, December 2, 2019

"Unseen" Progress

Ever since the main renovations were completed, improvements to the house have been slow, at first glance.  But, the work has been, mostly, focused on the attic.  After getting two quotes, as well as, another on-site visit resulting in no follow-up, we've decided to do the work ourselves.

The first step involved removing all the old wood Red Cedar shingles: yes, I found fragments of old, paper wrapping in the attic.  It was a tedious process, as it required delicately maneuvering across ceiling joists in an attempt to avoid disturbing the plaster ceilings. Surprisingly, I didn't find any random items, other than a 1970's style long-sleeved shirt buried in the existing mineral wool insulation.  Regardless, it was a dirty job, but one that gave me the opportunity to become intimately familiar with the attic.

While spending more time than I preferred in the attic, I discovered poor installation of the new bathroom vent ducting resulting in the connection becoming detached from the fan housing, a missing wiring panel plate for the bathroom fan housing (the workers didn't install it during the renovation), a barely attached range hood duct (hanging by one screw with about an inch of daylight to the roof cap, and connected wires for the bath/shower light that were not inside an electrical box, but just wire nutted and wrapped with electrical tape. *sigh*  I received a reduction from the contractor for all of these items, although he denied anything was wrong or that his worker had anything to do with the electric wires outside of an enclosed junction box. While I have detailed photographic proof of all these discrepancies, I have no desire to post them. More importantly, if someone who was quick to espouse their "40 years of experience", I was not going to let those items be corrected by someone who can't even admit fault on errors or poor workmanship.

Because of the previous items, I was sidetracked with correcting (replacing) every issue. Afterwards, I began the process of air sealing each top-plate, plumbing vent stack and electrical line penetrations, and around each ceiling box.  Ever since we purchased our home, I discovered Building Science Corporation, namely Dr. Joseph Lstiburek.  I've read numerous papers he has written and, while I won't go into all the detail of what he has written, namely "stack effect", here is a good overview of the work I have been doing in the attic and should be finished by next weekend.

The final step will be to install the insulation.  My wife and I will complete the work ourselves, saving close to 50% of the cost.  The final insulation rating will be R60, which is overkill, but inexpensive versus R49 (recommended for our area).  While I wanted to install blown-in cellulose or Roxul, I'm not certain the plaster ceilings will support the weight over the long term. Yes, I've done the calculations and the weight differences are substantial. Instead, blown-in fiberglass will be used.  It should make a huge difference in the indoor comfort, especially on those really cold days and nights. There should, also, be some benefit in the Summer against radiant heat from the attic.

When I'm done, there are some who would consider the painful detail and work I have done is overkill. But, this is a house we'll live in for a very long time--no plans to "move up" or "downsize". I believe 830 sq ft is already downsized... :)

No pics this time, but when we're done, I'll post some before and afters.